FAQ
Table of Contents
- Forgot your password?
- How can I enable WebGL in my browser?
- Raspberry Pi: Error opening serial port “ttyAMA0”
- Webcam Streaming with Raspberry Pi
- Restream RTSP to M-JPEG
- Connect to an Arduino using WiFi
- Install Native Addons with Node.js v4
- Install Serialport on OS X El Capitan
- Kernel panic issue on macOS Sierra for devices using the CH340G, CH34G or CH34X chipset
- Testing without Arduino board
Forgot your password?

cncjs 1.8 adds multi-account management support to enable secure web access and web socket connections. The web interface will automatically redirect user to the Sign In page when at least one user account has been enabled in Settings > Account.
If you forgot your password, find user account settings in the ~/.cncrc file, and remove all existing users:
- Linux / Mac:
~/.cncrc(e.g./home/pi/.cncrc) - Windows:
%USERPROFILE%\.cncrc(e.g.C:\Users\User Name\.cncrc)
"users": []
Otherwise, you can also set the “enabled” attribute to a false value for all users to disable secure web access. For example:
"users": [
  {
    "id": "......",
    "enabled": false,
    "name": "admin1",
    "password": "......"
   },
   {
    "id": "......",
    "enabled": false,
    "name": "admin2",
    "password": "......"
   }
]
How can I enable WebGL in my browser?
Navigate to http://webglreport.com/ to make sure your browser support WebGL.
If your browser does not support WebGL due to certain reasons, follow instructions below to enable WebGL: http://superuser.com/questions/836832/how-can-i-enable-webgl-in-my-browser
Chrome
First, enable hardware acceleration:
- Go to chrome://settings
- Click the + Show advanced settings button
- In the System section, ensure the Use hardware acceleration when available checkbox is checked (you’ll need to relaunch Chrome for any changes to take effect)
Then enable WebGL:
- Go to chrome://flags
- Ensure that Disable WebGL is not activated (you’ll need to relaunch Chrome for any changes to take effect)
Raspberry Pi: Error opening serial port “ttyAMA0”
You may got this error when using the GPIO serial device on the Raspberry Pi:
$ .npm/bin/cnc -vv
Started the server at http://0.0.0.0:8000/.
2016-07-17T12:13:40.292Z - error: [cncserver] Error opening serial port "ttyAMA0": err={}
Add a .cncrc file under the login (home) directory (e.g. ~/.cncrc) with the following configuration to specify the path /dev/ttyAMA0:
{
    "ports": [
        {
            "comName": "/dev/ttyAMA0",
            "manufacturer": ""
        }
    ]
}
Run cnc again and you will see that /dev/ttyAMA0 is available to use:

Permission denied error
If you still cannot connect to /dev/ttyAMA0, use the serialport-terminal tool to check if a “Permission denied” error occurred:
$ node_modules/serialport/bin/serialport-terminal.js -p /dev/ttyAMA0 -b 115200
Error [Error: Error: Permission denied, cannot open /dev/ttyAMA0]
Follow these steps to fix the permission denied error:
- Make sure your login account is a member of the
dialoutgroup:
$ sudo vim /etc/group
add add your login account if not available:
dialout:x:20:pi,<your_login_account>
- Remove references to
/dev/ttyAMA0from/boot/cmdline.txt:
The original contents
dwc_otg.lpm_enable=0 console=ttyAMA0,115200 console=tty1 root=/dev/mmcblk0p6 rootfstype=ext4 elevator=deadline rootwait
and new contents
dwc_otg.lpm_enable=0 console=tty1 root=/dev/mmcblk0p6 rootfstype=ext4 elevator=deadline rootwait
- Disable the getty on that serial port in
/etc/inittabby commenting out the following line:
#T0:23:respawn:/sbin/getty -L ttyAMA0 115200 vt100
- Reboot
Webcam Streaming with Raspberry Pi
Checkout mjpg-streamer to learn how to stream JPEG data from the input_raspicam plugin via HTTP, and follow the steps in this article:
- Make sure you have an updated version of Raspberry Pi’s OS.
- Install
libv4l-0package, available in Raspbian:sudo aptitude install libv4l-0. - Connect the web camera to USB. The web camera must be Linux compatible; to check this, make sure
/dev/video0file is available on Raspberry Pi, else the camera does not have a Linux driver or required extra configuration to work. - Download mjpg-streamer-rpi.tar.gz archive on Raspberry Pi and extract it. Destination folder is not relevant. You don’t need root access if you are using the default pi user. Go to
mjpg-streamerfolder, where you extracted thetar.gzfile. - Open
mjpg-streamer.shfile; this is a simple bash script to control the mini-webserver. The header contains some writable parameters, as refresh rate or resolution. The default settings should work in most situations. - Start the server with
./mjpg-streamer.shstart command in the current folder. - Run your prefered web browser and go to http://raspberrypi:8080/?action=stream (where raspberrypi is it’s IP address). You should see the image from the webcam. Current version has some issues with Chrome, just use Firefox if the image is not refreshed.
- If the system doesn’t work, see the
mjpg-streamer.logfile for debug info.
See below required commands for not-Linux geeks:
$ sudo aptitude install libv4l-0
$ ls /dev/video0
$ wget http://www.bobtech.ro/get?download=36:mjpg-streamer-rpi
$ mv get\?download\=36\:mjpg-streamer-rpi mjpg-streamer-rpi.tar.gz
$ tar -zxvf mjpg-streamer-rpi.tar.gz
$ cd mjpg-streamer
$ sudo nano mjpg-streamer.sh
$ ./mjpg-streamer.sh start
Once you have finished setup, input the URL in the webcam widget to play the M-JPEG stream:
# Replace raspberrypi with your IP address
http://raspberrypi:8080/?action=stream
Change Video Parameters
To change video parameters you have to install v4l2-ctl:
$ sudo apt-get install v4l-utils
$ v4l2-ctl --list-ctrls
$ v4l2-ctl --set-ctrl brightness=200
$ v4l2-ctl --set-ctrl saturation=32
Download
http://www.howtoembed.com/get?download=36:mjpg-streamer-rpi
Restream RTSP to M-JPEG
FFmpeg is available for Windows and Linux, but FFserver is available only on Linux.
Sample ffserver.conf file:
HTTPPort 8090

<Feed webcam.ffm>
  File /tmp/webcam.ffm
  FileMaxSize 50M
</Feed>

<Stream webcam.mjpg>
  Feed webcam.ffm
  Format mpjpeg
  VideoBufferSize 8000
  VideoCodec mjpeg
  VideoFrameRate 24
  VideoSize 640x480
  NoAudio
</Stream>
After that started server with command:
$ ffserver -d -f ffserver.conf
and run streaming with command:
$ ffmpeg -i "rtsp://<ip-camera>/" http://localhost:8090/webcam.ffm
Now you can input the URL in the webcam widget to play the M-JPEG stream:
http://localhost:8090/webcam.mjpg
Connect to an Arduino using WiFi

These articles might be useful if you want to connect to Arduino using WiFi:
Module Setup (w/ Breakout Board)
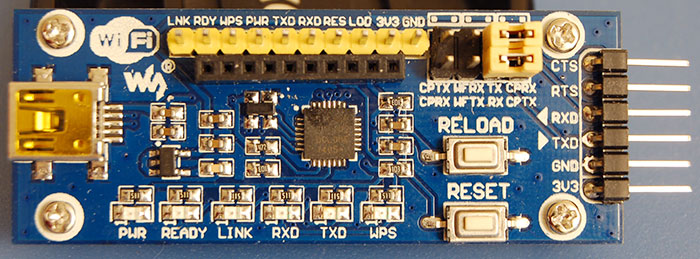
| WiFi232 | Arduino |
|---|---|
| Pin 1 (GND) | GND |
| Pin 2 (3.3V) | 3V3 (3.3V) |
| Pin 5 (RX) | Pin 1 (TX) |
| Pin 6 (TX) | Pin 0 (RX) |
Johnny-Five Setup
Node.js – Pseudo Terminal (~/dev/ttyV0) – TCP Socket (10.0.1.12:8899)
- Use
socatto fake a serial terminal:
socat -d -d pty,nonblock,link=$HOME/dev/ttyV0 tcp:10.0.1.12:8899
- Execute it like this:
node blink.js ~/dev/ttyV0
Install Native Addons with Node.js v4
Source: https://github.com/fivdi/onoff/wiki/Node.js-v4-and-native-addons
Installing gcc/g++ 4.8 on Raspbian Wheezy for the Raspberry Pi
Run apt-get update to update the system’s package list:
sudo apt-get update
Install gcc/g++ 4.8 as below:
sudo apt-get install gcc-4.8 g++-4.8
sudo update-alternatives --install /usr/bin/gcc gcc /usr/bin/gcc-4.6 20
sudo update-alternatives --install /usr/bin/gcc gcc /usr/bin/gcc-4.8 50
sudo update-alternatives --install /usr/bin/g++ g++ /usr/bin/g++-4.6 20
sudo update-alternatives --install /usr/bin/g++ g++ /usr/bin/g++-4.8 50
Check to see which versions of gcc/g++ are installed:
pi@raspberrypi ~ $ gcc --version
gcc (Raspbian 4.8.2-21~rpi3rpi1) 4.8.2
Copyright (C) 2013 Free Software Foundation, Inc.
This is free software; see the source for copying conditions.  There is NO
warranty; not even for MERCHANTABILITY or FITNESS FOR A PARTICULAR PURPOSE.

pi@raspberrypi ~ $ g++ --version
g++ (Raspbian 4.8.2-21~rpi3rpi1) 4.8.2
Copyright (C) 2013 Free Software Foundation, Inc.
This is free software; see the source for copying conditions.  There is NO
warranty; not even for MERCHANTABILITY or FITNESS FOR A PARTICULAR PURPOSE.
It should now be able to install native addons with io.js v3 or Node.js v4 or higher.
If required, use the following commands to switch between the different version gcc/g++, like so:
sudo update-alternatives --config gcc
sudo update-alternatives --config g++
Install Serialport on OS X El Capitan
If you’re running with OS X El Capitan (version: 10.11), and the installation fails with error ld: library not found for -lgcc_s.10.5, check out the following ways:
- Check out Installing the Xcode Command Line Tools.
- If you do not have Xcode installed, just install Xcode 7 from App Store.
- There is an issue with Mac OS X 10.11 and Xcode 6. If your Xcode version is 6.x, you need to upgrade it to Xcode 7, or use this as temporary fix:
cd /usr/local/lib
sudo ln -s ../../lib/libSystem.B.dylib libgcc_s.10.5.dylib
Kernel panic issue on macOS Sierra for devices using the CH340G, CH34G or CH34X chipset
Download and install the latest driver from https://github.com/adrianmihalko/ch340g-ch34g-ch34x-mac-os-x-driver.
Testing without Arduino board
Before you can get started, you will need an Arduino UNO/Nano board based on the ATmega328P. Download the latest Grbl firmware from the Grbl repository, and flash Grbl to an Arduino.
If you don’t have an Arduino, check out grbl-sim and follow the instructions below to compile Grbl into an executable for your computer:
- Clone this repository into the directory containing the Grbl source code (i.e.
<repo>/grbl/), like so:
$ git clone git@github.com:grbl/grbl.git
$ cd grbl/grbl
$ git clone git@github.com:grbl/grbl-sim.git
$ cd grbl-sim
- Edit the Grbl-sim Makefile to select the correct
PLATFORM =line. - Run
make newto compile the Grbl sim. It will create an executable file namedgrbl_sim.exe. See below:
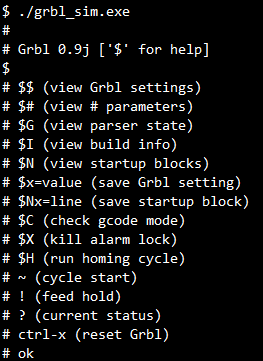 .
.
- On Linux, run the updated version of simport.sh (
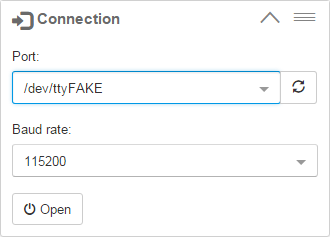
examples/grbl-sim/simport.sh) to create a fake serial port (/dev/ttyFAKE), and use it to test your Grbl interface software. - Copy .cncrc from examples to the home directory, and run
cnc -c ~/.cncrcto start the server. The configuration file should look like below:
{
    "ports": [
        {
            "comName": "/dev/ttyFAKE",
            "manufacturer": "grbl-sim"
        }
    ]
}
- Open
/dev/ttyFAKEfrom the Connection widget to interact with the Grbl simulator as if connected to an Arduino with Grbl.

FAQ
Table of Contents
- Forgot your password?
- How can I enable WebGL in my browser?
- Raspberry Pi: Error opening serial port “ttyAMA0”
- Webcam Streaming with Raspberry Pi
- Restream RTSP to M-JPEG
- Connect to an Arduino using WiFi
- Install Native Addons with Node.js v4
- Install Serialport on OS X El Capitan
- Kernel panic issue on macOS Sierra for devices using the CH340G, CH34G or CH34X chipset
- Testing without Arduino board
Forgot your password?
cncjs 1.8 adds multi-account management support to enable secure web access and web socket connections. The web interface will automatically redirect user to the Sign In page when at least one user account has been enabled in Settings > Account.
If you forgot your password, find user account settings in the ~/.cncrc file, and remove all existing users:
- Linux / Mac:
~/.cncrc(e.g./home/pi/.cncrc) - Windows:
%USERPROFILE%\.cncrc(e.g.C:\Users\User Name\.cncrc)
"users": []
Otherwise, you can also set the “enabled” attribute to a false value for all users to disable secure web access. For example:
"users": [
  {
    "id": "......",
    "enabled": false,
    "name": "admin1",
    "password": "......"
   },
   {
    "id": "......",
    "enabled": false,
    "name": "admin2",
    "password": "......"
   }
]
How can I enable WebGL in my browser?
Navigate to http://webglreport.com/ to make sure your browser support WebGL.
If your browser does not support WebGL due to certain reasons, follow instructions below to enable WebGL: http://superuser.com/questions/836832/how-can-i-enable-webgl-in-my-browser
Chrome
First, enable hardware acceleration:
- Go to chrome://settings
- Click the + Show advanced settings button
- In the System section, ensure the Use hardware acceleration when available checkbox is checked (you’ll need to relaunch Chrome for any changes to take effect)
Then enable WebGL:
- Go to chrome://flags
- Ensure that Disable WebGL is not activated (you’ll need to relaunch Chrome for any changes to take effect)
Raspberry Pi: Error opening serial port “ttyAMA0”
You may got this error when using the GPIO serial device on the Raspberry Pi:
$ .npm/bin/cnc -vv
Started the server at http://0.0.0.0:8000/.
2016-07-17T12:13:40.292Z - error: [cncserver] Error opening serial port "ttyAMA0": err={}
Add a .cncrc file under the login (home) directory (e.g. ~/.cncrc) with the following configuration to specify the path /dev/ttyAMA0:
{
    "ports": [
        {
            "comName": "/dev/ttyAMA0",
            "manufacturer": ""
        }
    ]
}
Run cnc again and you will see that /dev/ttyAMA0 is available to use:
Permission denied error
If you still cannot connect to /dev/ttyAMA0, use the serialport-terminal tool to check if a “Permission denied” error occurred:
$ node_modules/serialport/bin/serialport-terminal.js -p /dev/ttyAMA0 -b 115200
Error [Error: Error: Permission denied, cannot open /dev/ttyAMA0]
Follow these steps to fix the permission denied error:
- Make sure your login account is a member of the
dialoutgroup:
$ sudo vim /etc/group
add add your login account if not available:
dialout:x:20:pi,<your_login_account>
- Remove references to
/dev/ttyAMA0from/boot/cmdline.txt:
The original contents
dwc_otg.lpm_enable=0 console=ttyAMA0,115200 console=tty1 root=/dev/mmcblk0p6 rootfstype=ext4 elevator=deadline rootwait
and new contents
dwc_otg.lpm_enable=0 console=tty1 root=/dev/mmcblk0p6 rootfstype=ext4 elevator=deadline rootwait
- Disable the getty on that serial port in
/etc/inittabby commenting out the following line:
#T0:23:respawn:/sbin/getty -L ttyAMA0 115200 vt100
- Reboot
Webcam Streaming with Raspberry Pi
Checkout mjpg-streamer to learn how to stream JPEG data from the input_raspicam plugin via HTTP, and follow the steps in this article:
- Make sure you have an updated version of Raspberry Pi’s OS.
- Install
libv4l-0package, available in Raspbian:sudo aptitude install libv4l-0. - Connect the web camera to USB. The web camera must be Linux compatible; to check this, make sure
/dev/video0file is available on Raspberry Pi, else the camera does not have a Linux driver or required extra configuration to work. - Download mjpg-streamer-rpi.tar.gz archive on Raspberry Pi and extract it. Destination folder is not relevant. You don’t need root access if you are using the default pi user. Go to
mjpg-streamerfolder, where you extracted thetar.gzfile. - Open
mjpg-streamer.shfile; this is a simple bash script to control the mini-webserver. The header contains some writable parameters, as refresh rate or resolution. The default settings should work in most situations. - Start the server with
./mjpg-streamer.shstart command in the current folder. - Run your prefered web browser and go to http://raspberrypi:8080/?action=stream (where raspberrypi is it’s IP address). You should see the image from the webcam. Current version has some issues with Chrome, just use Firefox if the image is not refreshed.
- If the system doesn’t work, see the
mjpg-streamer.logfile for debug info.
See below required commands for not-Linux geeks:
$ sudo aptitude install libv4l-0
$ ls /dev/video0
$ wget http://www.bobtech.ro/get?download=36:mjpg-streamer-rpi
$ mv get\?download\=36\:mjpg-streamer-rpi mjpg-streamer-rpi.tar.gz
$ tar -zxvf mjpg-streamer-rpi.tar.gz
$ cd mjpg-streamer
$ sudo nano mjpg-streamer.sh
$ ./mjpg-streamer.sh start
Once you have finished setup, input the URL in the webcam widget to play the M-JPEG stream:
# Replace raspberrypi with your IP address
http://raspberrypi:8080/?action=stream
Change Video Parameters
To change video parameters you have to install v4l2-ctl:
$ sudo apt-get install v4l-utils
$ v4l2-ctl --list-ctrls
$ v4l2-ctl --set-ctrl brightness=200
$ v4l2-ctl --set-ctrl saturation=32
Download
http://www.howtoembed.com/get?download=36:mjpg-streamer-rpi
Restream RTSP to M-JPEG
FFmpeg is available for Windows and Linux, but FFserver is available only on Linux.
Sample ffserver.conf file:
HTTPPort 8090

<Feed webcam.ffm>
  File /tmp/webcam.ffm
  FileMaxSize 50M
</Feed>

<Stream webcam.mjpg>
  Feed webcam.ffm
  Format mpjpeg
  VideoBufferSize 8000
  VideoCodec mjpeg
  VideoFrameRate 24
  VideoSize 640x480
  NoAudio
</Stream>
After that started server with command:
$ ffserver -d -f ffserver.conf
and run streaming with command:
$ ffmpeg -i "rtsp://<ip-camera>/" http://localhost:8090/webcam.ffm
Now you can input the URL in the webcam widget to play the M-JPEG stream:
http://localhost:8090/webcam.mjpg
Connect to an Arduino using WiFi
These articles might be useful if you want to connect to Arduino using WiFi:
Module Setup (w/ Breakout Board)
| WiFi232 | Arduino |
|---|---|
| Pin 1 (GND) | GND |
| Pin 2 (3.3V) | 3V3 (3.3V) |
| Pin 5 (RX) | Pin 1 (TX) |
| Pin 6 (TX) | Pin 0 (RX) |
Johnny-Five Setup
Node.js – Pseudo Terminal (~/dev/ttyV0) – TCP Socket (10.0.1.12:8899)
- Use
socatto fake a serial terminal:
socat -d -d pty,nonblock,link=$HOME/dev/ttyV0 tcp:10.0.1.12:8899
- Execute it like this:
node blink.js ~/dev/ttyV0
Install Native Addons with Node.js v4
Source: https://github.com/fivdi/onoff/wiki/Node.js-v4-and-native-addons
Installing gcc/g++ 4.8 on Raspbian Wheezy for the Raspberry Pi
Run apt-get update to update the system’s package list:
sudo apt-get update
Install gcc/g++ 4.8 as below:
sudo apt-get install gcc-4.8 g++-4.8
sudo update-alternatives --install /usr/bin/gcc gcc /usr/bin/gcc-4.6 20
sudo update-alternatives --install /usr/bin/gcc gcc /usr/bin/gcc-4.8 50
sudo update-alternatives --install /usr/bin/g++ g++ /usr/bin/g++-4.6 20
sudo update-alternatives --install /usr/bin/g++ g++ /usr/bin/g++-4.8 50
Check to see which versions of gcc/g++ are installed:
pi@raspberrypi ~ $ gcc --version
gcc (Raspbian 4.8.2-21~rpi3rpi1) 4.8.2
Copyright (C) 2013 Free Software Foundation, Inc.
This is free software; see the source for copying conditions.  There is NO
warranty; not even for MERCHANTABILITY or FITNESS FOR A PARTICULAR PURPOSE.

pi@raspberrypi ~ $ g++ --version
g++ (Raspbian 4.8.2-21~rpi3rpi1) 4.8.2
Copyright (C) 2013 Free Software Foundation, Inc.
This is free software; see the source for copying conditions.  There is NO
warranty; not even for MERCHANTABILITY or FITNESS FOR A PARTICULAR PURPOSE.
It should now be able to install native addons with io.js v3 or Node.js v4 or higher.
If required, use the following commands to switch between the different version gcc/g++, like so:
sudo update-alternatives --config gcc
sudo update-alternatives --config g++
Install Serialport on OS X El Capitan
If you’re running with OS X El Capitan (version: 10.11), and the installation fails with error ld: library not found for -lgcc_s.10.5, check out the following ways:
- Check out Installing the Xcode Command Line Tools.
- If you do not have Xcode installed, just install Xcode 7 from App Store.
- There is an issue with Mac OS X 10.11 and Xcode 6. If your Xcode version is 6.x, you need to upgrade it to Xcode 7, or use this as temporary fix:
cd /usr/local/lib
sudo ln -s ../../lib/libSystem.B.dylib libgcc_s.10.5.dylib
Kernel panic issue on macOS Sierra for devices using the CH340G, CH34G or CH34X chipset
Download and install the latest driver from https://github.com/adrianmihalko/ch340g-ch34g-ch34x-mac-os-x-driver.
Testing without Arduino board
Before you can get started, you will need an Arduino UNO/Nano board based on the ATmega328P. Download the latest Grbl firmware from the Grbl repository, and flash Grbl to an Arduino.
If you don’t have an Arduino, check out grbl-sim and follow the instructions below to compile Grbl into an executable for your computer:
- Clone this repository into the directory containing the Grbl source code (i.e.
<repo>/grbl/), like so:
$ git clone git@github.com:grbl/grbl.git
$ cd grbl/grbl
$ git clone git@github.com:grbl/grbl-sim.git
$ cd grbl-sim
- Edit the Grbl-sim Makefile to select the correct
PLATFORM =line. - Run
make newto compile the Grbl sim. It will create an executable file namedgrbl_sim.exe. See below:
.
- On Linux, run the updated version of simport.sh (
examples/grbl-sim/simport.sh) to create a fake serial port (/dev/ttyFAKE), and use it to test your Grbl interface software. - Copy .cncrc from examples to the home directory, and run
cnc -c ~/.cncrcto start the server. The configuration file should look like below:
{
    "ports": [
        {
            "comName": "/dev/ttyFAKE",
            "manufacturer": "grbl-sim"
        }
    ]
}
- Open
/dev/ttyFAKEfrom the Connection widget to interact with the Grbl simulator as if connected to an Arduino with Grbl.